How to Install WordPress on XAMPP (LocalHost) in 5 Minutes

Installing WordPress on local computer has many advantages including complicated editing and XAMPP tool is one of the best tool that allows anyone to do so. It is easy to install, control and manage.
This article will guide you to install XAMPP software on your computer then It will help you to install WordPress on XAMPP within 5 minutes. So let's get started with installing the software on your computer.
How to Install XAMPP?
Off course, You need XAMPP software setup to install it. Just visit official website and download the right version for your computer.
Once done, Run the installer and make sure to check MySQL and Apache because these are the most important thing you need to have to install WordPress on your local server.
Once finished, You need to reboot your computer otherwise Apache server may not work. After that just start the both MySQL and Apache services.

Now, Let's create a database for your WordPress blog first and to do that you need to go to MySQL database setting page.
Just click on "Admin" in your the second row where it says MySQL. Once done, It will automatically open your default browser with MySQL database page.

Create a new Database and call it what ever you’d like to for example "PresentBlogging".
MySQL database setting page is the page where you will be able to create, edit, delete databases and users.
Just click on "Admin" in your the second row where it says MySQL. Once done, It will automatically open your default browser with MySQL database page.

MySQL database setting page is the page where you will be able to create, edit, delete databases and users.
How to Install WordPress on XAMPP?
First download the latest version of WordPress from the official website. Keep in mind, It's a zip file that you need to extract after downloading.
Once done, Go to the location where you have installed the XAMPP and then htdocs directory.
By default it is in C drive so go to C:/XAMPP then htdocs. Now just extract the WordPress zip file to this location (C:/Xampp/htdocs).
After that open your browser and type "localhost" or http://localhost in your URL address bar which will redirect you to setup configuration page.


Hurry, You have successfully installed WordPress on your local computer using XAMPP tool. Now enjoy your local WordPress blog and do experiment whatever you want without worrying about your original blog.
Once done, Go to the location where you have installed the XAMPP and then htdocs directory.
By default it is in C drive so go to C:/XAMPP then htdocs. Now just extract the WordPress zip file to this location (C:/Xampp/htdocs).
After that open your browser and type "localhost" or http://localhost in your URL address bar which will redirect you to setup configuration page.

Now just select your language and click on "continue".

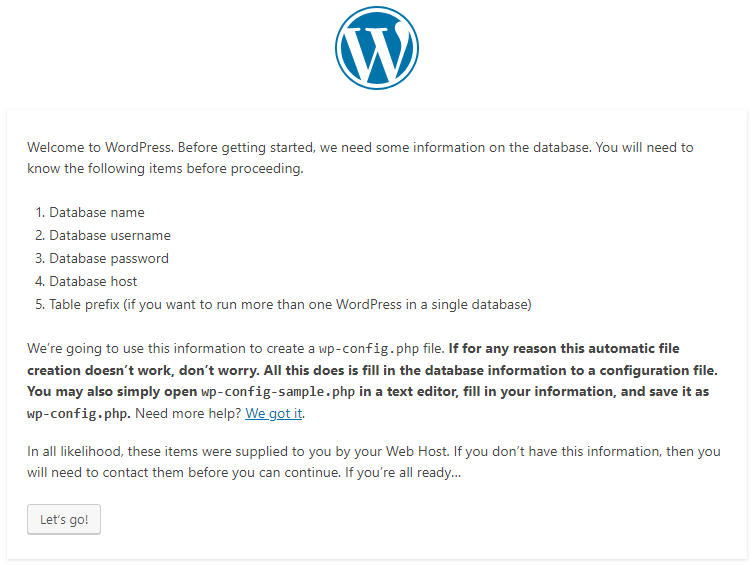
When you click on continue, It will redirect you to WordPress welcome setup configuration page and what you have to do is, Just press "Let’s Go".

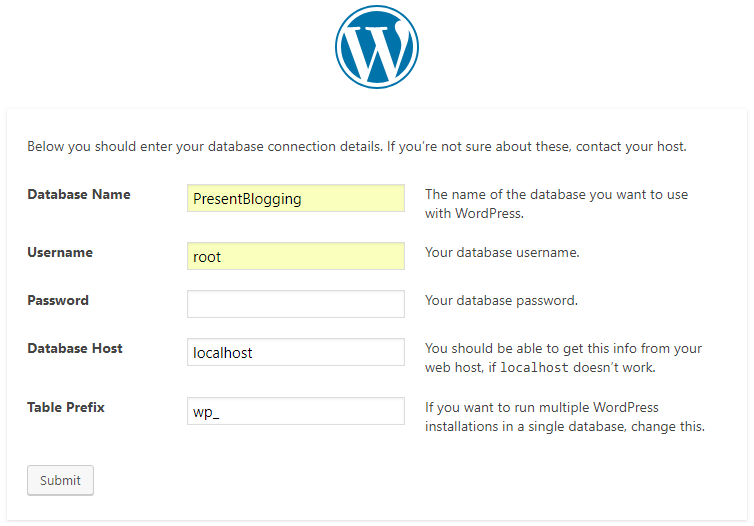
Once done, You will be redirected to database connection page where you need to enter the following details given below.

- Database name: (The database you created earlier)
- Username: (Your MySQL database username default: root)
- Password: (Your MySQL password, leave it empty)
- Host: Localhost
- Table Prefix: (You can leave it WP_ or leave it empty.)
Once filled all the details, Just click on "Submit" button and If everything is OK then It will show you successful message.


Now simply click on "Run the installation" which will redirect you to another page where you need to create your Admin account.

Just fill all the details according to yourself and then click on "Install WordPress". Once done, You can login to your local WordPress blog with your given details.
Hurry, You have successfully installed WordPress on your local computer using XAMPP tool. Now enjoy your local WordPress blog and do experiment whatever you want without worrying about your original blog.
WordPress Security Settings
Leaving everything default can risk your computer safety so it's better to change the default settings and to do that, You need to add a password to every default user in your MySQL center.
To add password, Just go to http://localhost/phpmyadmin. After that, in the top menu search for "users" then select one user, and click edit Edit Privileges scroll down until you see password. Add your password of choice and then press GO.
Do this for each user and once done, be sure to go to c:/XAMPP/htdocs, and search for wp-config. Open it up with any text editor, and search for:
/** MySQL database username */
define(‘DB_USER’, ‘root’);
/** MySQL database password */
define(‘DB_PASSWORD’, ‘ pass here ‘);
and change the username and password to the new ones and you are done. If you’re facing any problems let us know in form of comments below.


