
How to Make a Website using Gator Website Builder Easily

Gator Website Builder is basically a drag-and-drop page builder that allows you to make a website without any coding skill or experience.
This newly launched product, Gator aims to make website building possible for anyone. It’s perfect for even a complete novice who doesn’t have much experience with computers.
If you’re able to share a post on Facebook or send an email, then you’ll able to build your own fully functioning websites in minutes using Gator Websites Builder.
With its user-friendly interface, all you need to do is simply drag and drop site elements until you’re satisfied with your site.
- You don’t need to code.
- No technical expertise and experience in HTML, CSS and other coding languages is needed.
- All-in-one building and hosting convenience
- Get your website online in the fastest and easiest way.
- Allow you to focus on content.
- You can start selling things online.
- No learning curve.
Getting up and running with Gator Website Builder is pretty straightforward and simple.
1. Choose a plan
To start creating your brand new site, click here to claim your free domain and get your Gator Website Builder plan with my special price.
Now, you’re on HostGator official site. You can see that there are 3 different plan choices here: Starter, Premium and eCommerce.
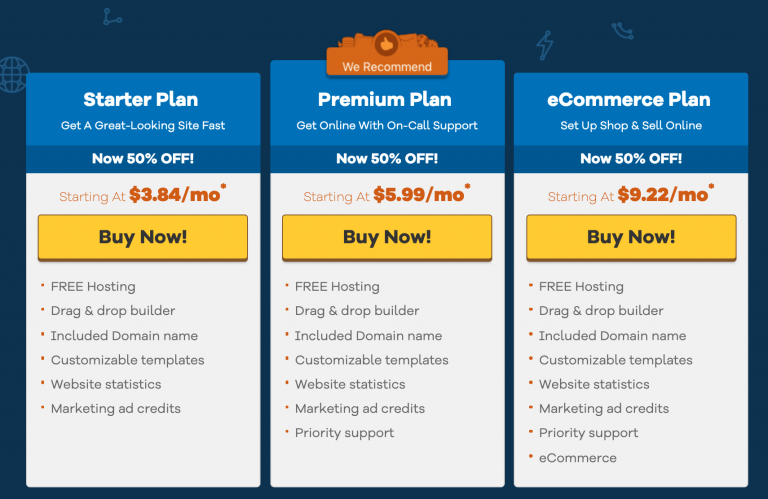
If you’re just starting out, the Starter plan has everything you need to create your first website. I’d suggest you start with the least you can afford, you can upgrade later as your online business grows.
If you’re looking for priority support, the Premium plan is best for you. You can get fast online call support whenever needed.
If you’re ready to sell your product and start an online store, go for the eCommerce plan. This is the most expensive plan that gives you a full range of built-in eCommerce features to build a professional-looking online store.
Once you’ve chosen the right package, click “Buy Now” button to proceed.
2. Get a Free Domain Name
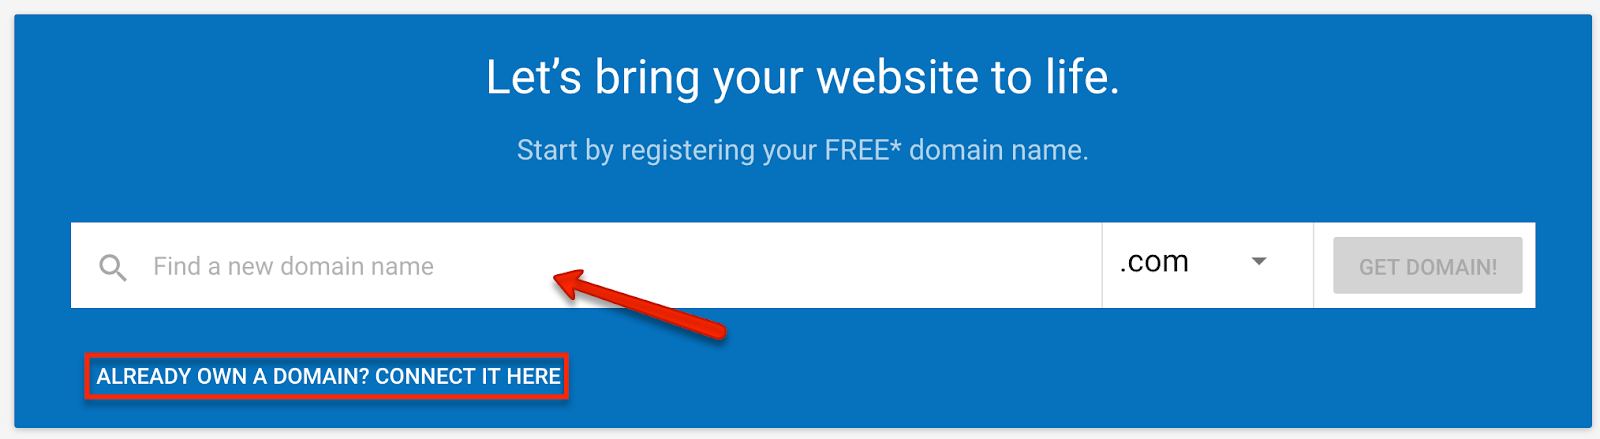
After selecting a plan, you’ll be directed to a page where you can claim a FREE domain name.
To get a FREE domain, all you have to do is choose 12 or 24 months worth of Gator Website Builder plan.
What if you already have a domain name purchased or you decided to get a domain from another company?
No worries. What you need to do is take an extra step of connecting the existing domain that you want to use to HostGator.
Anyway, you’re still entitled to get a free domain with the GATOR plan.
To put simply, it’s more convenient to just get a domain through HostGator. This is because you don’t have to point your domain’s name servers (DNS) to your HostGator account. Plus, you can save more money with the Free domain.
Tips for choosing a domain name
- Keep it short, simple and easy to remember. Unfortunately, most of the short domain names are already taken. You can use domain name generator to turn your ideas into fresh, available domains.
- Make it easy to spell. Avoid using a long and confusing name. You don’t want your visitors to mistype your domain name and end up on a different website.
- Use .com extension instead of others like .org, .net, .info, .biz. According to Registrar Stats research, over 75%of the domains have “.com”, followed by “.net” and “.org”. “.com “is easier to remember and more familiar.
- Think long term. Your domain will define your brand and business for years. You don’t to go through the trouble of changing your domain name in the future which will cost you money, SEO rankings and branding.
Enter a domain name that you want to use in the “find a new domain name” box to check its availability. Once you’re satisfied with the domain and is available, click “Get Domain!”
If you already have a domain, click “connect it here” button to direct your domain to HostGator account.
3. Complete the HostGator Order Form
To save more money, you can sign up for the longest plan which is 2 years in the “Billing Cycle” section.
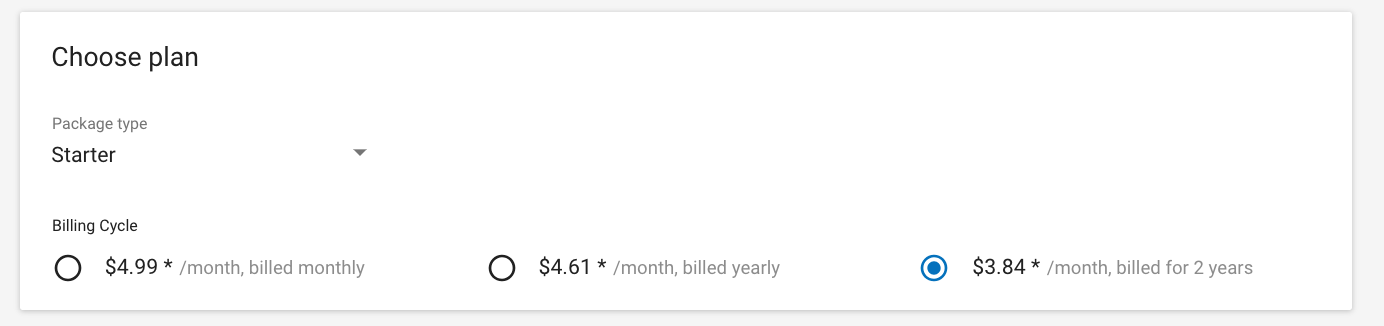
Do note that this special price (55% off) is only valid for your first bill. This means that you’ll have to pay the regular price when you renew your plan.
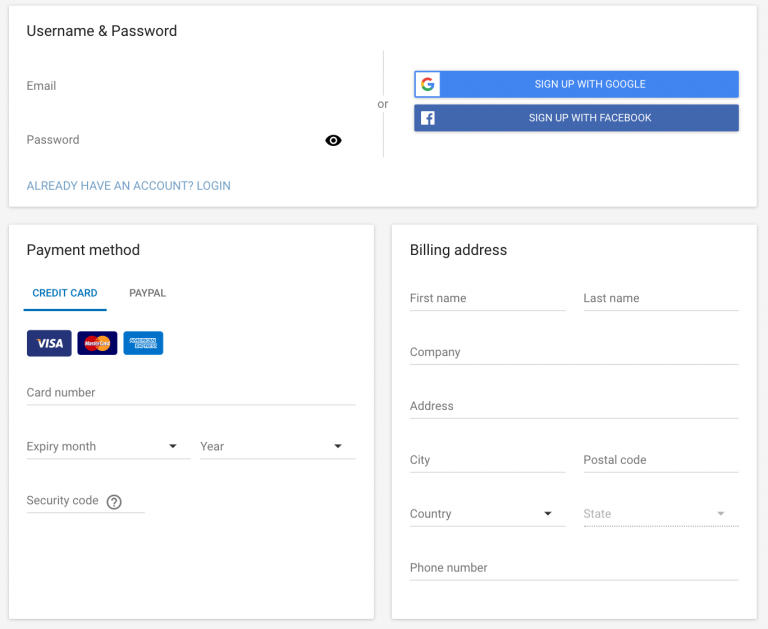
You’ll have to create a username and password, type in your billing address, and payment information. After confirming all the information is correct, click “Confirm Purchase”.
4. Select a Template
Next, login to your dashboard and start designing your website.
The first step in creating a website is to choose a theme that’s most suitable for your business.
There are over 200+ professional-designed templates to choose from. All the high-quality themes are free to use and come with a mobile-friendly version.
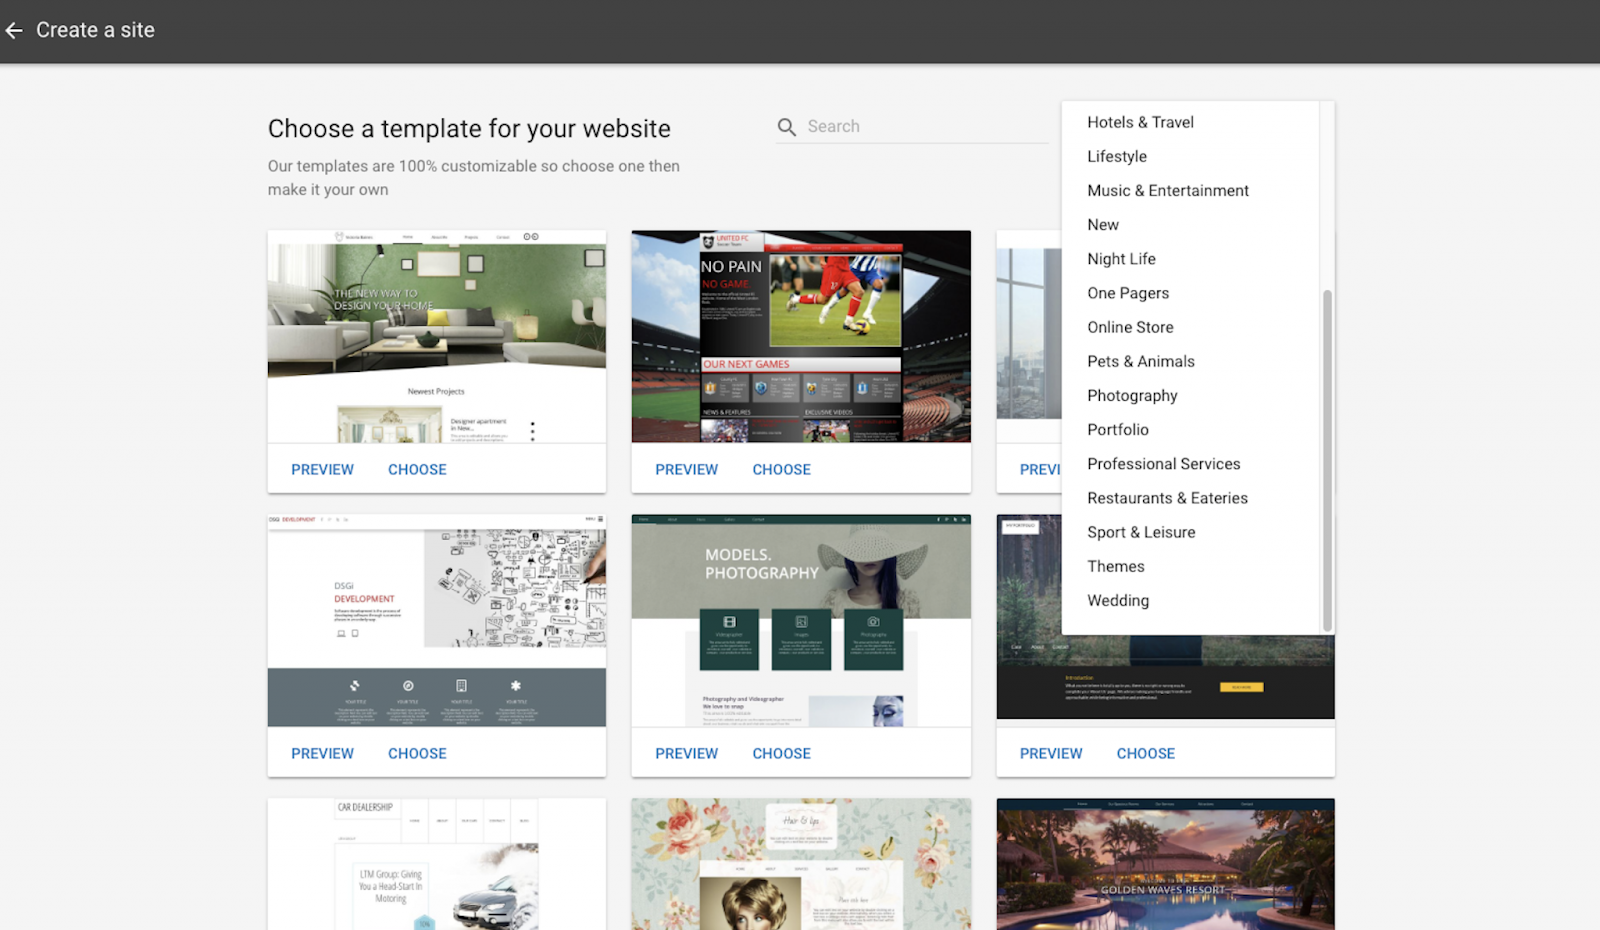
Simply choose a theme that’s similar to what you have in mind. You can always edit and customize it later.
To quickly find the right template for your niche, you can do a search by keyword or filter themes by category.

Click “Preview” button to have a closer look at a specific theme. On the top right of your screen, there’s an option to view the theme on both desktop and mobile.

Take some time to go through the themes, once you have decided on which template to pick, click “Choose” button.
5. Customize your template
The Drag and Drop Editor: After picking a theme for your website, click “Start Editing” and you’ll be taken to your main account dashboard.
This is the site builder where you can continue to customize your template as you like- change the fonts, text style or color scheme to match your business.
Now looking at your dashboard, you can see your menu is on the left side and the site preview and interface on your right panel.
The interface is very easy to use. You can move around the element by click and drag.
Customize your Design: You might want to customize your website to make it looks unique and suitable for your business.
With Gator Website Builder, you have 100% control on the appearance and layout of your pages.
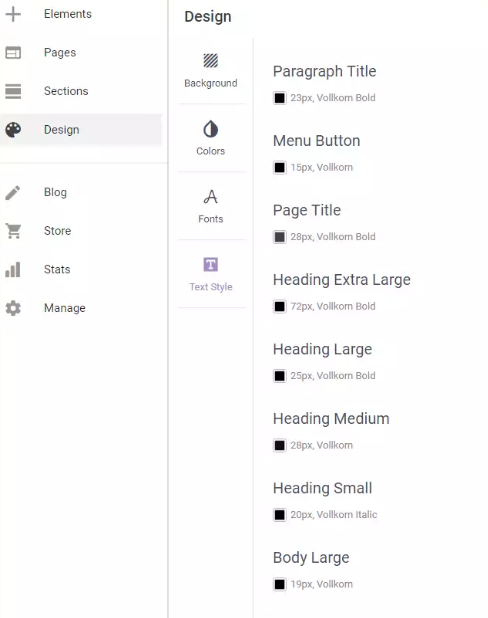
On the left side of your dashboard, you can see 4 main menu options:
- Elements
- Pages
- Section
- Design
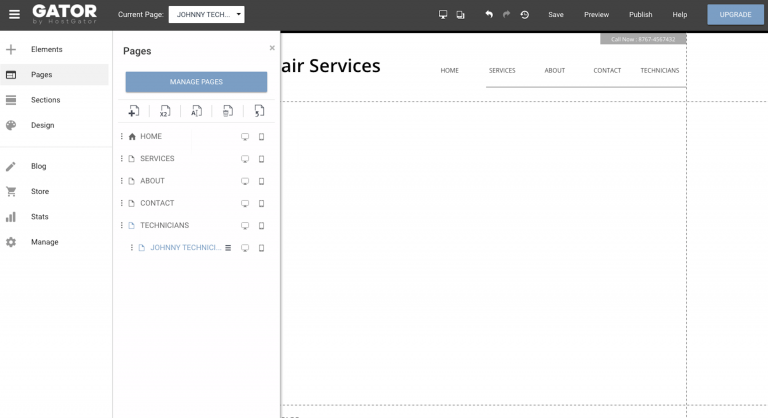
Depend on the chosen template, you’ll see several pages included by default.
By clicking “Pages” button on the left side of your dashboard, you can edit, add or remove any of the pages.
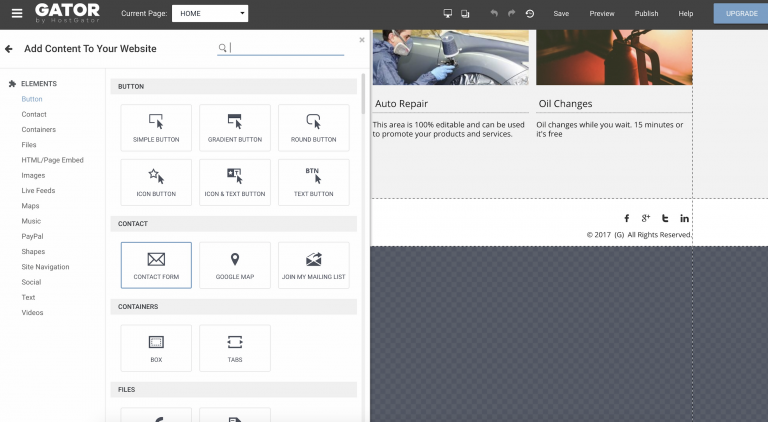
If you like to add new elements to the page, click “Elements”.
There are many different elements you can integrate into your pages, such as add a button, video, image, text, payment button (Paypal) and even a map with Google Maps.
To add an element into your page, click on the chosen element from the menu, and then click it on the location that you’d like to place it. If you’re not sure what you want, you can always drag it around till you’re satisfied.
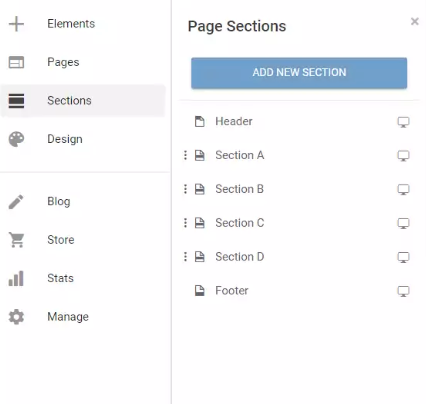
Sometimes, it’d be too cumbersome to manage a lengthy page. What you can do is add new sections on your page.
As its name suggests, Sections are small parts that can be rearranged on a page. Each section has its own style and elements.
To add a section on a page, simply click “Sections” on the menu. It helps you to customize your page efficiently. Instead of dragging the elements one-by-one, you can now click and drag the whole section around.
And lastly, with the “Design” option you can change the website look and style including color scheme, fonts, and text styles.
If you want to start a blog…
You don’t have to choose between running a basic website or a blogging platform. Because GATOR site offers both.
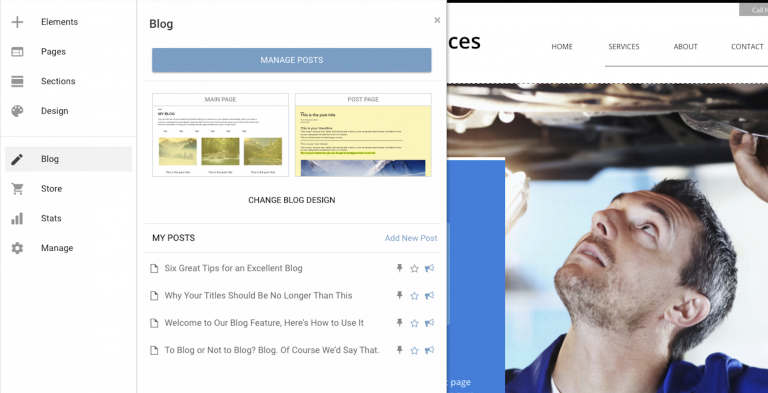
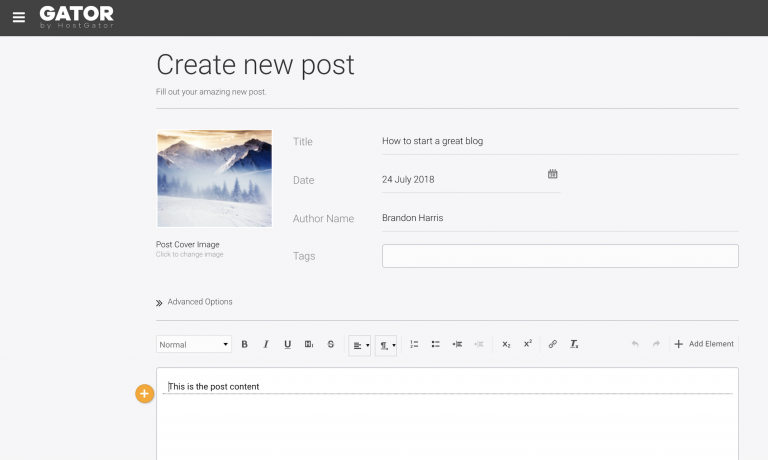
It’s very easy to start blogging on GATOR, all you need to do is click “Blog” on the left sidebar and click “Start a blog”.
If you want to start an eCommerce business with online store…
To start an online store, you have to choose “eCommerce” Plan when you sign up or upgrade your account later.
To add a store, simply click “Store” menu option on the left side. And you’ll be prompted to choose a store template for your products.
It offers a full range of online store and basic features that you need:
- Inventory management
- Coupon codes
- Payment Processors
- Sale reports
6. Track and analyze your website
With the built-in analytics and tracking tools, you can now keep track of your website progress all within a single platform.
The integrated tracking tools allow you to track web metrics such as:
- Number of page views
- Bounce rate
- Visitor demographics
- And more.
If you’re already using Google Analytics, you can insert your tracking code in the “manage site”.
With this detailed data and reports about your audience, it helps to make better decisions to improve and promote your business.
7. Free Stock Photos
No matter which package you sign up for, you can access a large library of high-quality images at NO charge. All the photos are license free, which means you can use these photos for any legal purpose, even for commercial use.
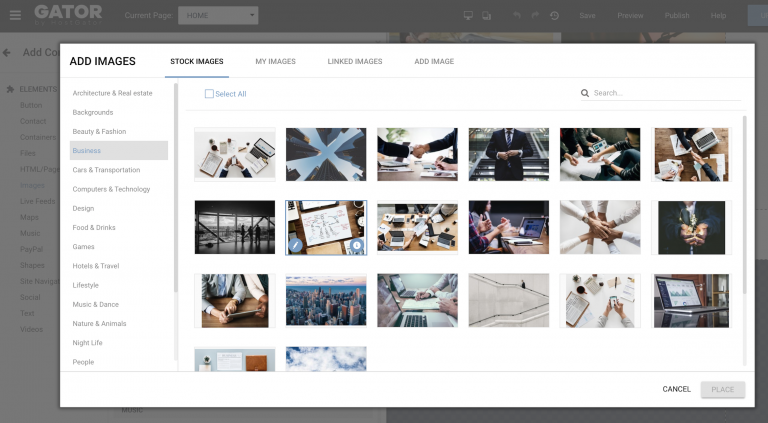
This is a real-time saving. You no longer have to search for images, downloading it and then uploading to your site.
Conclusion
Considering all the great features and affordable packages, Gator Website Builder is truly amazing for those who are looking for a hassle-free way to making a website.
That’s it! Now you should have your brand new website/online store for cheap.
Preview, test and start creating content on your site!
- Create your own professional website, blog or online store for less than $3.50/month! (I got the price down for you)
If you have any question or problem with HostGator, I’m here to help, you can contact me here.
Do you have any problem or question following this tutorial to create your own blog with HostGator? Feel free to comment below


