Speed Up WordPress 10x Faster By W3 Total Cache + CloudFlare
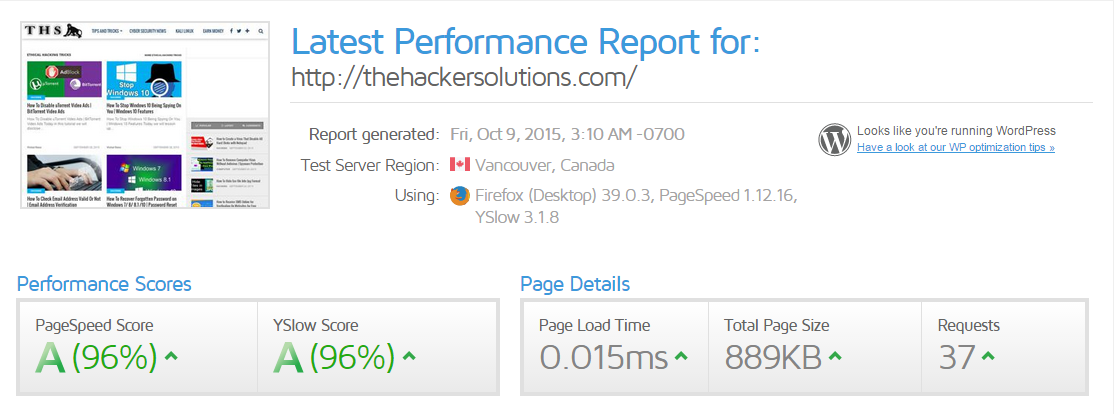
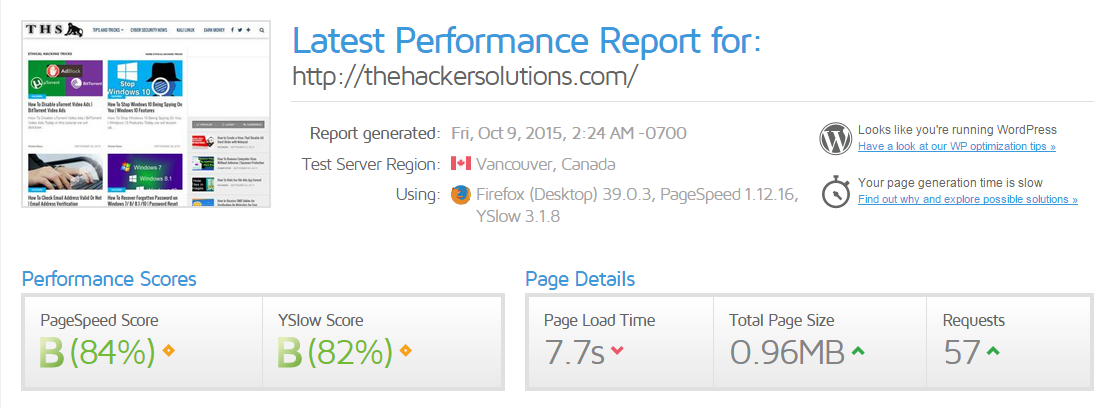
Are you worried about your WordPress site speed? Did you try different techniques without success? Hold your breath, we had a little experiment on w3 total cache and Cloudflare. The result is the straight 10x improvement in the load time!
Before we proceed, you could ask why did I consider website performance in the arsenal? Does it matter for marketing or SEO? To be honest “Yes, absolutely”.
I want to share those three important facts what persuaded me. I bet so will you?
- Google counts on site speed as a ranking factor. (Source: GWCB)
- 40% of people abandon a website that takes more than 3 seconds to load. (Source: Akamai)
- If an e-commerce site is making $100,000 per day, a 1-second page delay could potentially cost $2.5 million in lost sales every year. (Source: Kissmetrics)
I googled “how to improve page loading time” and got a ton of ideas. But soon I realized:
- The methods provided are geeky, not every individual person can do that.
- The suggested plugins itself cannot give that stunning improvement.
- The tools and services mentioned are the maximum paid.
Searching by the eagle’s eye, my attention got into a forum where a person suggested, Try w3 total cache + Cloudflare combo. So is my task. I installed that plugin and enabled Cloudflare.
You guess it worked? Nope, page load was not satisfactory, at least not for me. It improved by a pinch, but I was looking for a stunning speed.
Maybe the configuration was not correct. So I kept researching and testing different settings, and all of a sudden, I got it worked. The speed improved by 10x! (proves are given afterward)
I get scared to think how desperate I was then and how long it took to come out successful. So finally I’ve decided to share the full walk-through, in case many sufferings like me would be over.
By going through this post, you will know how to make the perfect combination of these two which are absolutely free of cost.
Introducing w3 total cache (Wordpress Plugin)
W3 Total Cache is an easy WordPress Performance Optimization (WPO) framework that enhances the user experience by utilizing cache, minify and CDN. This is the only caching plugin available providing advanced and flexible features.How does it work? In short, it will minimize the number of HTTP requests, reduce the page size, and so is the page load time. It has got authority’s choice including HostGator, GoDaddy, Mashable, Yoast who use to recommend it for always.
Installing
First, you need to install this plugin from the wordpress repository. Go to Plugins > Add New from WordPress admin panel, search “W3 Total Cache”, then install and activate it.
Configuring
You will see a new tab “Performance” added to your left WordPress admin menu. Hover on it and you will see a few more subpages. The basic configurations are located at “General Settings” page, where the advanced options are available separately.For your better understanding, I will explain them, point by point in the correct order. So figuring it out will be much easier than ever!
1. General Settings
1.1. General- Toggle all caching types on or off (at once): Unchecked
- Preview mode: Disabled
On the other side, by activating preview mode, you can test settings before applying it. So you may or may not use it. In our case, it seemed not required as we knew what we were doing.
But beware, when it is enabled, your settings will be saved separately and it will not show up for the public. You will need to click the “Deploy” button to apply those changes to the main site.

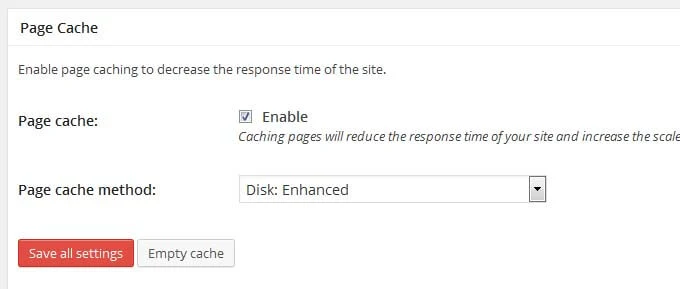
- Page cache: Checked
- Page cache method: Disk: Enhanced
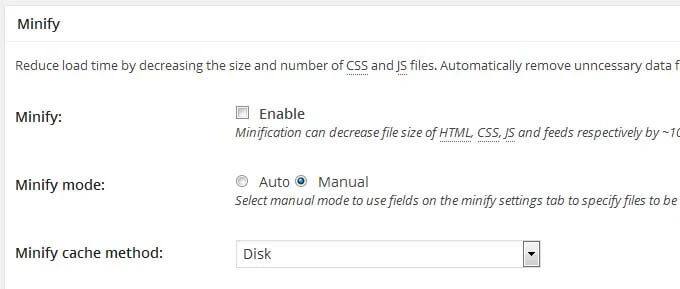
- Minify: Disabled
Actually, Cloudflare also supports minify. It seems like Cloudflare minify can give better performance. We noticed sometimes w3 total cache minify can break a site. But we didn’t encounter any single problem with Cloudflare. So we enabled minify on Cloudflare and disabled it on the w3 total cache.
Please be noted that allowing minify both on w3 total cache and Cloudflare can also break your site. So stay safe, use it in one place. We preferred Cloudflare.
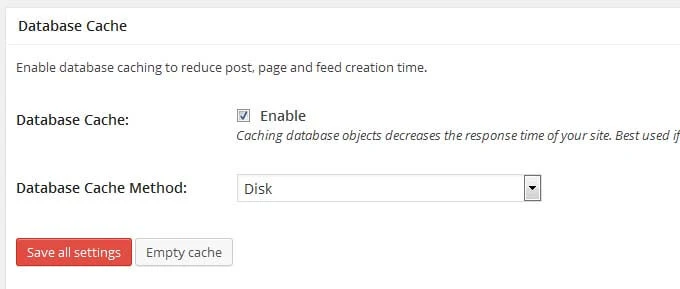
- Database Cache: Checked
- Database Cache Method: Disk
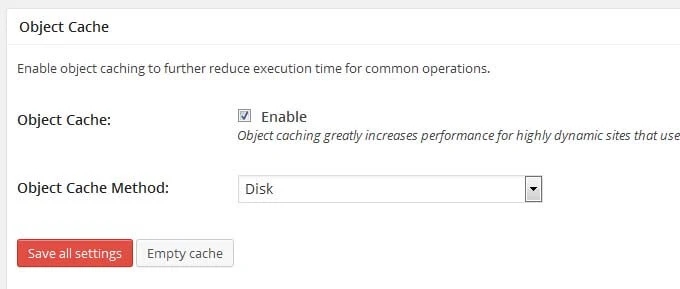
- Object Cache: Checked
- Object Cache Method: Disk
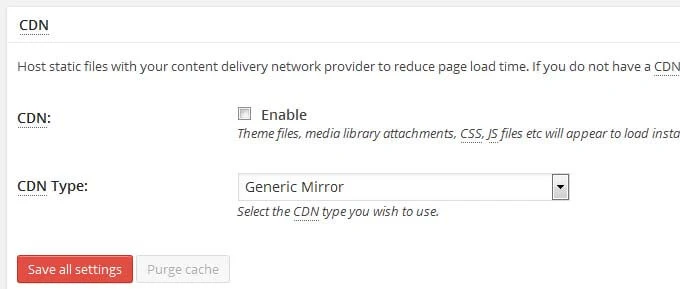
- CDN: Unchecked
Here in this post, we wanted to show how to reduce page load time without spending a single penny. So we are leaving it unchecked. In case you can afford to invest in it, you should definitely do. I bet it will make more improvement.
- Enable varnish cache purging: Unchecked
1.8. Monitoring
- New Relic: Unchecked
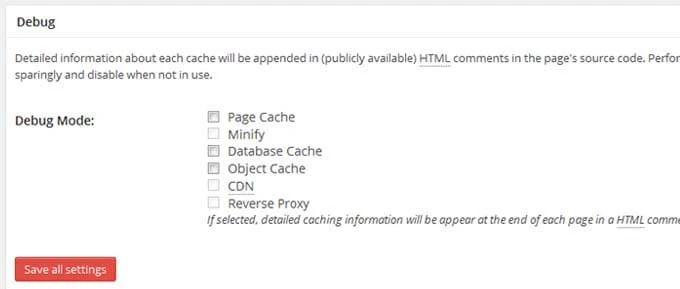
1.9. Debug
- Page Cache: Unchecked
- Database Cache: Unchecked
- Object Cache: Unchecked
2. Page Cache
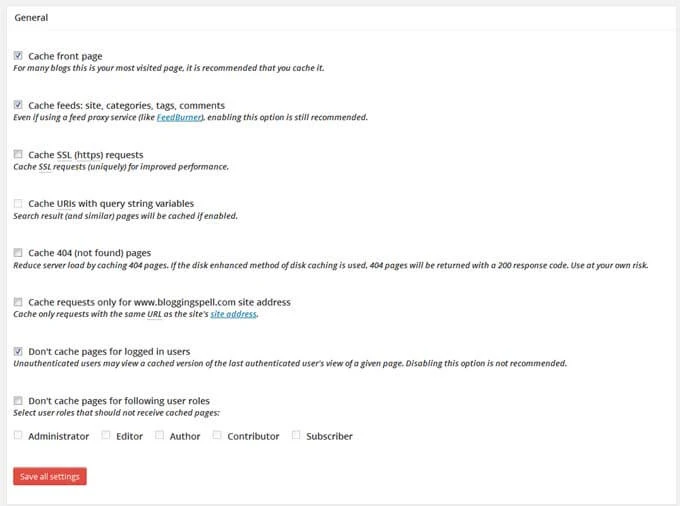
2.1. General- Cache front page: Checked
- Cache feeds: site, categories, tags, comments: Checked
- Don’t cache pages for logged in users: Checked
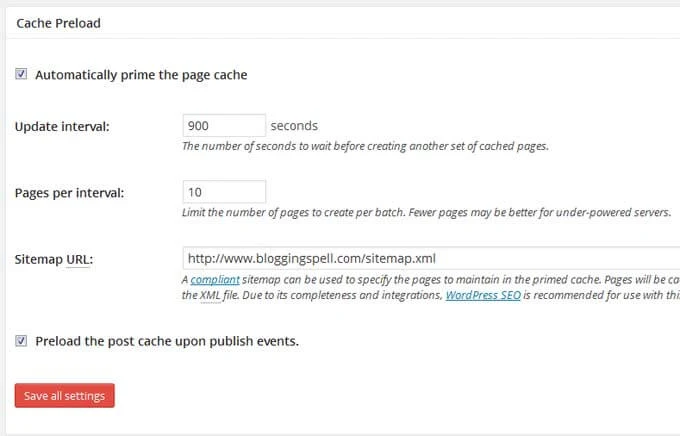
- Automatically prime the page cache: Checked
- Update interval: 900 seconds
- Pages per interval: 10
- Sitemap URL: Your current XML sitemap
- Preload the post cache upon publish events: Checked
- Everything: Default
2.4. Advanced
- Garbage collection interval: 3600 seconds
- Comment cookie lifetime: 1800 seconds
- Everything else: Default

3. Minify
- We had nothing to do here
Below in this post, we will talk more about Cloudflare minify and how to configure it.
4. Database Cache
4.1. General- Don’t cache queries for logged in users: Checked

- The maximum lifetime of cache objects: 180 seconds
- Garbage collection interval: 3600 seconds
- Everything else: Default

5. Object Cache
5.1. Advanced- The default lifetime of cache objects: 180 seconds
- Garbage collection interval: 3600 seconds
- Everything else: Default

6. Browser Cache
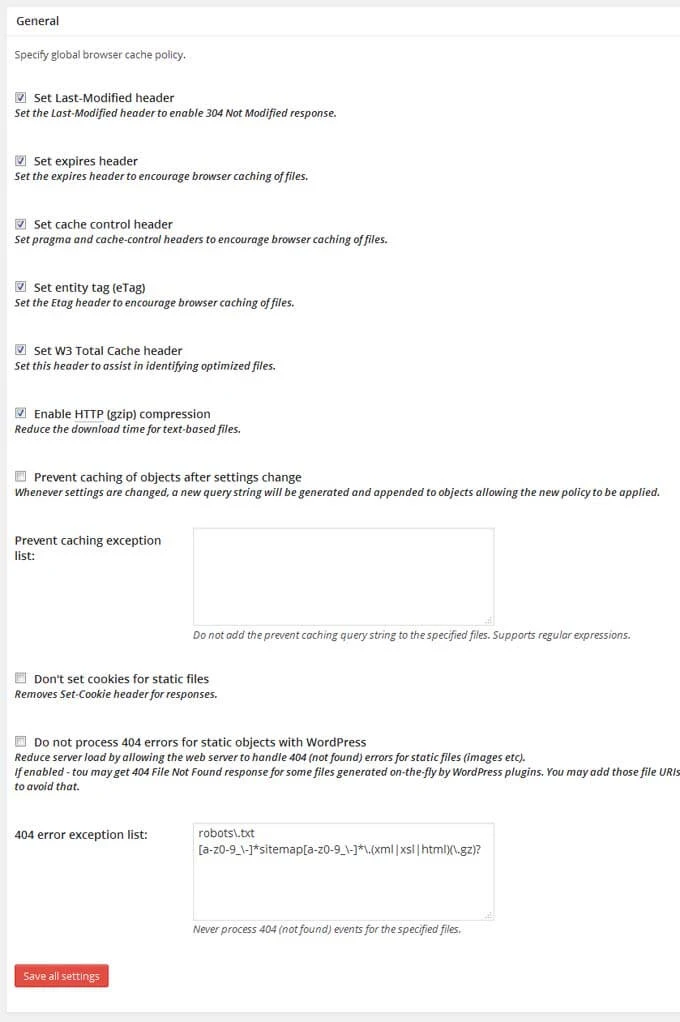
6.1. General- Set Last-Modified header: Checked
- Set expires header: Checked
- Set cache control header: Checked
- Set entity tag (ETag): Checked
- Set W3 Total Cache header: Checked
- Enable HTTP (gzip) compression: Checked
- Others: Unchecked
- Expires header lifetime: 31536000 seconds
- Cache-Control policy: cache with max-age (“public, max-age+EXPIRES_SECONDS”)
- Everything else: Same as “6.1. General”

- Expires header lifetime: 3600 seconds
- Cache-Control policy: cache with max-age (“public, max-age+EXPIRES_SECONDS”)
- Everything else: Same as “6.1. General”

- Everything: Same as “6.2. CSS & JS”

7. CDN
- We had nothing to do here
But still, if you afford to get a CDN service, please do. It will certainly improve your load time. However, we may not talk here but in another post in the future. Please note that we got 10x improvement without using any external CDN.
Setting up an external CDN with Cloudflare would be geeky. Here is a helpful tutorial by TutsPlus, Activating Ludicrous Speed: Combine CloudFlare With a CDN on Your Blog.
8. Extensions
- CloudFlare: Activated

Introducing Cloudflare
Cloudflare is a US based company who provides content delivery network, performance optimization, security optimization, and web analytics to supercharge a website in just five minutes. You will be amazed to know their starting package is totally free!They have some exciting technologies such as Rocket Loader, Aggressive Caching, Distributed DNS System, which are accelerating more than 785,000 websites (according to the report of 2012) and counting.
Installing
1. Create an account: Simply go to https://www.cloudflare.com/sign-up and create a new account.2. Select a website: Right after you sign up, you will be asked to enter your website. So there is nothing more to do, just enter your domain and click “Add website”.
3. Configure your records: Cloudflare will perform a 60 seconds test. In the meanwhile, they will show you a video about how it works. Please do check the video for further knowledge. When the scan is completed, click the “Continue” button.
Now your website’s DNS records will be listed. You will see orange or gray clouds on the right side of DNS records. Orange cloud means that is accelerated by Cloudflare. And the gray cloud means that is bypassed by Cloudflare.
Make sure your root domain and sub-domains have orange clouds. So they will be served from Cloudflare. You may also exclude any sub-domain from it. But it is recommended that you accelerate all with Cloudflare.
Here in Blogging Spell, we use www subdomain. For that, we’ve activated Cloudflare for two records:
Type A – thehackersolutions.com – points to *IP address*
CNAME – www – is an alias of thehackersolutions.com

- Choose a plan: Free
- Performance: CDN + Full Optimizations
- Security profile: Low
- Automatic IPv6: On
- SmartErrors: On
The process may vary from domain name providers. But you can find and change it from your domain manager. In case you can’t find it, you should contact your domain name provider.
An alternative method for cPanel based hosting
Nowadays, cPanel managed hosting comes with Cloudflare integrated. If your hosting provider supports it, you can enable Cloudflare in just one click.
Log in to your site’s cPanel and look for Cloudflare. If it is available, click on it and activate the cloud. That’s it.

- Choose any one method: You may choose the manual, or the cPanel integrated. But please do not combine these two. They could potentially cause problems.
- DNS prorogation can take up to 72 hours: In that period, your website could be unusable or inaccessible. There is nothing to worry, just wait.
Configuring
After your website successfully integrated with Cloudflare, you will see a green check mark. Now click on the gear icon and go to “CloudFlare settings” for further configuration. Then follow the settings as below sorted by the tabs.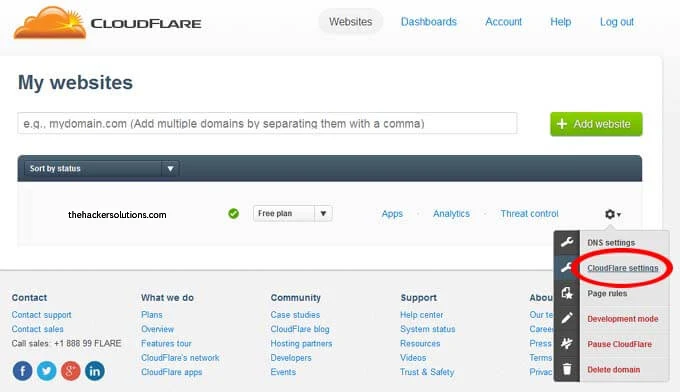
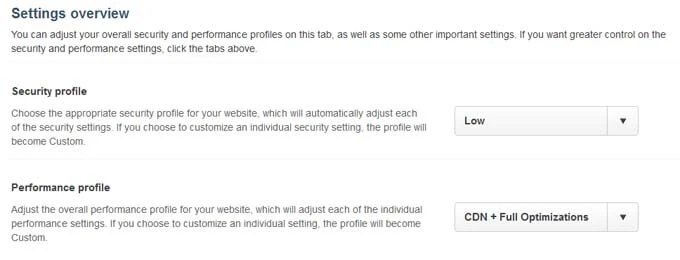
1. Settings overview
- Security profile: Low
- Performance profile: CDN + Full Optimizations
- Automatic IPv6: Full
- Always online: On
- IP Geolocation: On
- SSL: Flexible SSL
CDN + Full optimizations will ensure maximum performance. So it is recommended with all other options we suggested.
2. Security settings
- Basic protection level: Low
- Challenge passage TTL: 1 Week
- Email address obfuscation: On
- Server-side exclude (SSE): On

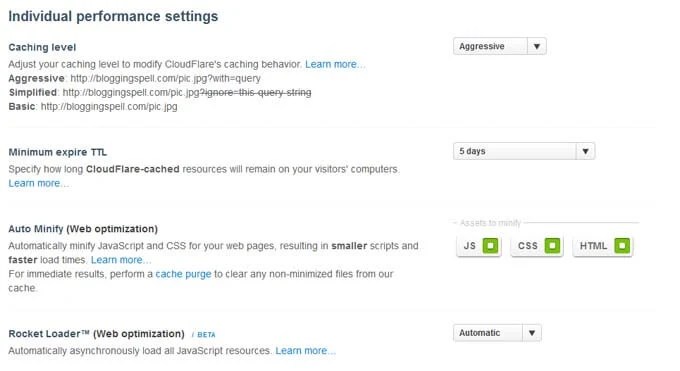
3. Performance settings
- Caching level: Aggressive
- Minimum expire TTL: 5 days
- Auto Minify (Web optimization): JS, CSS, HTML Checked
- Rocket Loader: Automatic
We kept minifying unchecked on the w3 total cache. So here you should check to minify for all JS, CSS, and HTML. We got better performance by using it.
Most importantly, you have to enable Rocket Loader “Automatic”. It is what significantly improved our load time. It will load javascript asynchronously, so they will no more affect page loading.
P.S: Sometimes you may see a javascript resource is not working because of rocket loader. In that case, you can exclude it and avoid the problem. You will find more about it here.
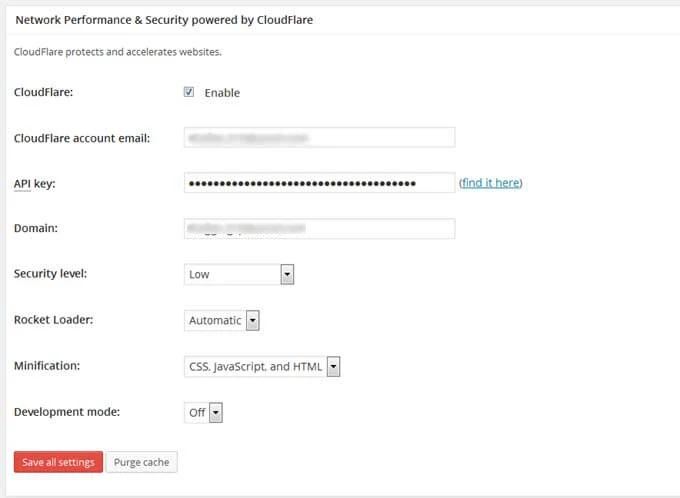
Integrating Cloudflare with W3 total cache
- Cloudflare: Enabled
Go right there, tick on Cloudflare, input account email, API key (what you will find in your Cloudflare “Account” page) and other values as we suggested in this post.
A few more things we considered
1. Good hosting provider
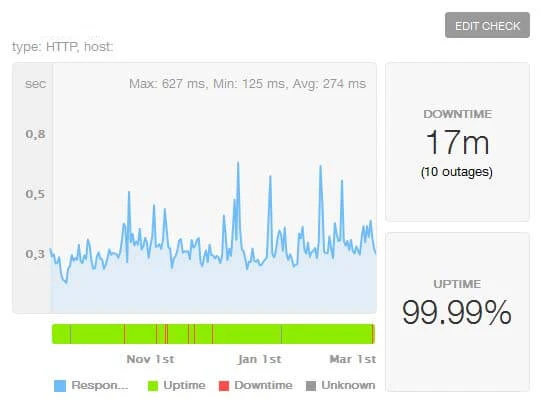
A better host means better uptime and better server response time. To be honest, your page load will partially rely on it. So choose a hosting provider who is capable of providing better response time and better uptime.How would you determine your host is good or bad? I use Pingdom Monitoring to track uptime and response time. I don’t want to keep it secret that HostGator is providing us brilliant service and never gave any chance to regret.
Here is our past six month’s report:
2. Premium/well-coded theme
A theme can unnecessarily delay page loading. A wrong code in a theme can prevent rendering or significantly delay it. For sure, it will affect your performance.Choose a theme that is coded professionally or Go for any high performing premium theme. We are currently using MyThemeShop. You know what all of their themes are optimized for ultra speed and SEO. That’s the reason why we use them.
3. Amount of plugins
Plugins can prove overwhelming for your site. Sometimes a single plugin can potentially delay several seconds in loading. So your task is to find out high impacting plugins and minimizing them for better performance.How would you find those plugins? There is a WordPress plugin named P3 Profiler what will help you identify which plugin is slowing your site. Install it and run the test. I bet you will come to realize what is causing higher loading.
4. Image optimization
Images consume the highest server resource next after scripts. If you are serious about load time, you have to be serious about images. Here is what we did to optimize our images for faster load time:- Specifying width: In our theme, text container is highest 680px in width. So we limited image width to 680px or less. In this way, we can save unnecessary bandwidth losing.
- Compressing image: We use the WP Smush.it plugin to compress images highly before using. You may not believe it can compress images for up to 50%.
- Image CDN: We use Jetpack Photon what will serve images from cookie-free domain and lower the site rendering time.
- Lazy loading: Currently we are not using Lazy Loading, but once we did. We noticed a significant improvement in page loading.
- Disabling hotlinking: Hotlinking of image can cause higher server resource consuming and sometimes it can crash your server. So it is recommended to disable hotlinking.
5. Database Optimization
The faster your database, the lower your time of content creation. In WordPress, database size can increase aimlessly with unused data. By keeping your database clean, you can lead way better performance.We use WP-Optimize to clear post revisions, auto drafts, spams, trashes, transient options, pingback, trackback, and many other unnecessary data.
The result!
